Project Time
The pandemic has hit us all in different ways. For me, I am one of those crazy people who is looking for a house and contributing to the housing madness. But since I have not yet found house (and it’s not for lack of trying – I’ve seen over 40 by now, and put multiple offers down), I have to distract myself with other projects.
When I moved to LA, I took this old folding table from my parents’ house with me. It had been languishing in storage, and the surface (some wood sticker thing? Contact paper?) was very slowly peeling off. Underneath was some sort of cork, I think. I don’t really know much about these things. Anyway, it’s a pretty heavy table, so definitely not plastic. And it was kind of ugly, mostly because the surface was peeling and I didn’t like it. So I decided to make it prettier!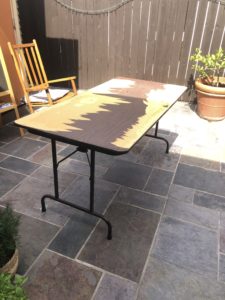
- Do an obsessive amount of research. Watch many YouTube videos. Read many blogs. Perhaps too many. Obviously, I had never done something like this before. My preferred craft is fabric, which is a lot softer. And generally more forgiving than wood. Sort of.
- Gather all the necessary materials. For me, this included all the basics like a saw and even work gloves because why would I ever need any of this before?
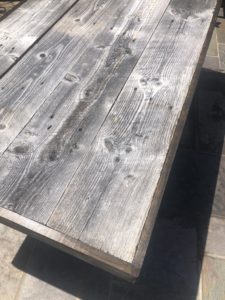
- Purchase the wood from a reclaimed wood store because it’s just so much prettier. And more sustainable and has so much more character! But also much, much more expensive. Oh well, it’s not like I have anywhere else to go to spend money…

- Lay out all your supplies and make a game plan. Do this multiple times just in case because, of course, I know nothing.
- Spray paint the legs of the table gold. Do this multiple times, because you probably missed a spot. Or a whole side. Who knows.

- Flip the table over and glue the reclaimed wood boards onto the table with glue. Make sure the wood is lined up the best you can, but since it’s reclaimed, also realize that the boards will not line up completely straight. It’s a sacrifice that’s acceptable because there’s just more character with something that’s not completely straight. So they say.
- Screw in the border! Start by measuring the border pieces and sawing off the extras to make them match. Maybe make a mistake, but that’s what the orbital sander and the wood filler is for. Drill in pilot holes and carefully hold the border in place, balanced precariously with your hip and one hand and drill the first screw in with your other hand.

- Fill in all the screw holes with wood filler and wait for it to dry.
- Sand the border smooth. Don’t sand the reclaimed wood surface, that would defeat the purpose of getting this more expensive wood in the first place.
- Clean the surface. Brush off as much sawdust as possible.
- Put tape down to protect the reclaimed wood from staining.
- Stain the border! Use multiple coats. I used 3.
- Take the tape off and admire your new table! Then be grateful a pandemic has driven you to such lengths that you’re learning new crafts.
- Show off to your parents and get roped into refurbishing their old furniture.