Upcycling cabinets… into a cabinet!
A while ago, I was redoing the kitchen/laundry area of my house, and my contractor thought the upper cabinets should be replaced. Admittedly, they were much older than the rest of my cabinets, and they ran all the way down to the counters, so I was losing valuable counter space. So I said okay.
Now, I have worked with this contractor many a time, and so he and I know each other fairly well. He comes up with all sorts of ideas for my house, and he said, “You should keep these cabinets! You can use them for storage in your studio.” And I thought there was no space in the studio (and it was a right hot mess, and still mostly is), so I wasn’t so sure, but I said okay anyway. I’m naturally a bit of a hoarder, and my contractor doesn’t help my hoarding tendencies whatsoever. I still have the screen door that was taken out just in case. A door that I replaced had a window, and while the door was too garbage to be saved, I do in fact still have that window. They kind of just live by the side of my house in a sort of material limbo. Which is where the cabinets ended up.
Until one day, after it had rained and these very obvious indoor cabinets had gained some wear and tear, I thought, what if I made a countertop next to my bathroom? As sort of an extra storage, because obviously due to my hoarding tendencies, I am constantly running out of places to put things.
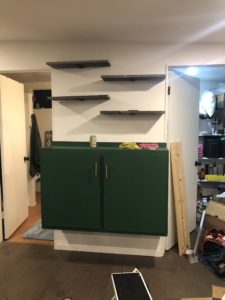
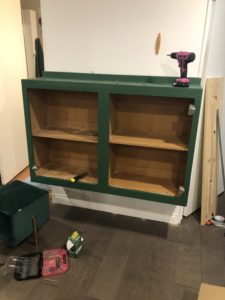
So inside the cabinets came, just to see if it was even feasible, and they happened to fit perfectly on the wall in between two doors! It was clearly meant to be! Of course, the cabinets had collected some dust and dirt from their sojourn outside, and some lumps and bumps and some water damage, so all of that needed to be repaired. And so the cabinets sat in the way of everything for weeks (actually months) until I got all the pieces going. They were attached together into one large cabinet, and I got some wood to go across the top and bottom of the cabinet to make a counter. Of course, the wood I got was the wrong size, so then we went to the supply limbo and got some wood from my gate that was replaced (see this is why I’m a hoarder) and cut it up and pieced the new wood and old wood together and voila, one whole piece. And there it sat for a few more weeks because I couldn’t move it by myself to sand the surface down.

Anyway, eventually, it was moved and sanded and the top was attached using the same puzzle piece method, and it was ready to be painted and attached to the wall! Only the wall had a massive bump. So while my boyfriend was ready to give up, I was still determined to make this work and the internet said all we had to do was shim the sides and install normally. Uh huh, okay! So the cabinet balanced precariously on two ottomans (super professional yes) and we shimmed the sides, 1/2 inch on the left and 1/4 inch on the right, and drilled in a million screws into the studs because that thing was heavy.
And then when we took away the ottomans, the cabinet miraculously was on the wall! It was a moment of joyous celebration and success.
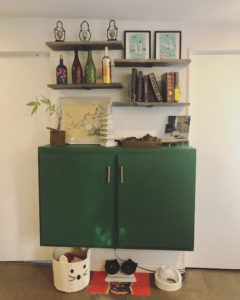
Next time I’ll tell you all about installing the shelving above the cabinets, which should have been the easier part, but involved making giant holes where the wall anchors didn’t stay put and an extra trip to the hardware store after more internet advice (spoiler alert: spring wall anchors. Worked like an oversized charm). I’ll never take those shelves down.